Update
With the extra time that we had to work on our papercraft projects, I was able to fix the issues with the strength of my item and get the gears into working order.

 |
| Details |
 |
| More details |

In order to get the horn to hold its own weight, I took apart the original and saved the biggest part of the horn as well as the needle. I printed two of each of the square base and the base of the horn to make them better bear the weight of the horn which already had 2 layers. I scored the base of the horn by hand so that the paper would not be cut on the fold lines.
 |
| The base of the horn with 2 layers |
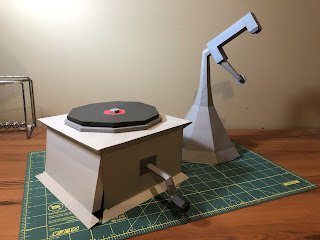
 |
| Finished object |
Original Post
The process for my final revision was a bit of a rollercoaster. I started out very eager to see how it would turn out, but it was not as successful as I had hoped. I think that it ultimately came down to my underestimating the amount of time that folding the final piece would take, so I was not able to adapt when I was met with unexpected challenges.
 |
| Render of final model |
 |
| Alternate angle |
 |
| Updated templates before printing |
During the feedback session, Bryan suggested that I add a handle and gear system to my model to make it possible for the record to spin. This feedback was very helpful in encouraging me to push my project further and I was excited to try to elevate it. With that, I looked at a few projects from previous classes and began to make changes to my model.
Many of the changes I made to my model were regarding increased stability and the gear system which would not be visible in the final version. i did make a few aesthetic changes by adding a handle and a few details to the box and vinyl record. To make the object more stable, I added another point of contact for the base that holds the horn and moved the horn further back on the base. On top of that, I added ridges on the inside of the box per Bryan's suggestion, as well as another wall on the inside of the box where the base connects. I also added a few holes and tabs that were missing in my prototype.
When I was researching types of gears, I was lucky to find a template for bevel gears made for papercraft on Thingiverse. I imported this template to Rhino, which saved me a lot of time, and redid the tabs. These gears are meant to convert movement onto different angles- for my project, I needed this at 90 degrees.
After that, I had the templates laser printed and began to fold them. Unfortunately, a few of my custom hidden lines did not take on the laser printer, so I had to do some scoring by hand.
 |
| Here are the parts for one of the gears and the handle |
 |
| Reversible record |
The construction of the separate elements went smoothly, but they did not come together as well.

When the laser cutter scored the lines for the base of the horn, it created holes in the paper so it was not possible to support its own weight, especially with the double layer of paper that I used to hide the tabs. As a result, I was not able to attach the horn to the box for my final revision. I ended up leaving the box open because I would like to print and score a new horn by hand and I will need to access the inside to attach it.

Comments
Post a Comment